Welcome-! If you want to exchange link, please simply add my link on your blog/website then leave message in chat box at the bottom of the page... Thank you-Happy reading~~

Wednesday, June 24

How to delete Browser Adware Extensions from Google Chrome

Few weeks ago I downloaded some softwares and accidentally put Adware Extensions in my Google Chrome. I've tried so many things from extensions setting, ADWCleaner, Malwarebytes Anti-malware, to Hitman Pro, NOTHING works!! Adware Siileicopoune/Sileicopoune keep popping ads joyfully in my Chrome. After reading so many pages in internet, I finally found the solution through "Regedit.exe". Is it totally works? Unfortunately, not much, since this adware can't be found in regedit. Today I found a good page and it WORKS!! Hoooraaaayy, Bye-bye Sileicopoune (or should I say, "SillyAdscoupone!")!! So I thought I'll share this little tutorial about how to delete Browser Adware in Google Chrome to you. This also works to delete Adware that's installed by Interprise Policy of Chrome

First of all, I forgot to capture the process while I deleting ADware, so I'll just use example of another extensions, "Adblock". Okay, this is just an example. I didn't recommend you to delete Adblock because this is the most useful and effective extensions to block Ads, at least for me.

Stop chit-chatting, let's get started !

1. Open our extensions by type Chrome://extensions or click Chrome menu button on the upper right, go to More tool, then click Extensions. Click on Developer tools to view the details. Find the extension, copy the ID and click the garbage icon. It's not finished yet. Keep going

.

2. If you are using Windows 7, Windows Vista or Windows XP, click on the Start button, then in the search box, type: regedit.exe and click on Regedit as seen below.
If you are using Windows 8, drag your mouse to the right edge of your screen, then type in the the search box: regedit.exe and click on Regedit.
For shortcut, you can press Windows Key + R to open the Run box, then type Regedit.exe to open Windows Registry Editor

The Registry Editor window should now open, then we will clik on Edit and select Find Next from the drop down menu. Alternatively, we can press F3

3. The Search box will be opened. Now we paste or type the Registry ID of the extension and click Find Next of just press Enter. If you found the key on the right bar, right click on it and select Delete. If you can't find it like what happened to me, don't worry, just skip this step and move to the next one.

4. Adwares and other malicious programs usually stay hidden. To show them up, we need to change our folder setting. Click Start button, and click Computer. Next click Organize and select Folder and search options.

5. Now, click on View tab and select Show hidden files, folders, and drives.

6. No hidden files anymore! Chrome extensions are stored in Chrome Extensions's default folders. IF you're using Windows Vista, Windows 7, or Windows 8, browse to C:\Users\your-username\AppData\Local\Google\Chrome\User Data . In the search box on the upper right, type or paste the Registry ID and press Enter. The result will show you the Extensions folders. Delete them all by right click to the folder and click Delete.

Voila ! The Adware Extensions has been deleted and clean !

Note : If you're using Windows XP, browse to %UserProfile%\Local Settings\Application Data\Google\Chrome\User Data.

That's the tutorial about how to delete bad Browser Adware Extensions from Google Chrome. This trick works really great for me, so I hope it will works for you too. Have a nice day people, and Happy Browsing !

Read more!

Wednesday, February 11

Molten Chocolate Lava Cake Recipe

Recently, I spend more and more time in the kitchen. Kitchen was a faraway land for me until last year, it became my escape land. Whenever I feel bored, irritated, happy, I go to kitchen, see what I have and begin to make something. Most of them are failure, tho.

This afternoon was no exception. After sewing all day long, I felt so tired and craving for sweet things. Brownies came to my mind at first, but, no, I want something lighter. Something that more mouth watering... something..... lava-ish. Ta..da!! Lava cake! Yes, please!! I've never baked lava cake. Furthermore, I never bake successful chocolate cake. But, oh, what can I say. Failure or not, chocolate is sweet and edible - hope so...

In 30 minutes,I found out that my Chocolate Lava Cakes are...... -take a deep breath- success!! So easy, simple, wow!


Now, let's make it together, shall we?

Ingredients :
170 grams semi-sweet chocolate
100 grams white sugar
60 grams all purpose flour
115 grams butter
1 tsp vanilla extract
4 tsp cocoa powder
4 eggs
Icing sugar/powdered sugar as garnish

How to :
1. Preheat oven to 232 Celcius.
2. Boil water in saucepan and put a bowl of butter and chocolate on top, for double broiler. Stir until melted. Remove, let it cool at room temperature while we mix other.
3. In another bowl, mix the egg until fluffy using high speed (count to 15). You can use whisk or mixer. Want a little work out? Use whisk - tiring, but a little work is nice. Oops, don't let any sweat drop into the bowl! Yuck!
4. Add sugar and vanilla. Mix them in low speed, then add cocoa powder. For tue rest of this recipe, we'll use low speed. Not too long, just until they're mixed. We don't want any overmix, do we?
5. At this point, the chocolate should have cool. Pour it into the bowl while being mixed. Add flour little by little and mix them. I don't want to put then all in 1 step and send them flying, bursting like a magic trick. No, no, I need baking magic the oven, not powder, not outside the oven.
6. Last step! Pour them in a cup. Wether it's cupcake tin, muffin tin, or ramekin, anything as long as it heat resistant and covered with a thin layer of butter. I fill the cups 3/4 full to get them with nice round tops, and to prevent them from spiloing out over the top of the cups like a lava monster (oh, save it for halloween-noted). Bake them for 8 minutes. Yes, only 8 minutes! This way, we'll get pretty, crazy runny chocolate in the center when we slit the cakes. Looks like they're competing to run into our mouth!


Funny is, I just knew that if we put them in room for hours, the middle top will drop a little, giving them a mortar-shape-liked. First, I doubted the center still melted and runny after hours. Guess what, they still run, baby! Straight to the mouth! 5 hours and still lava-ish. See the picture above? I took it after 5 hours. Amazing, isn't it?


Not bad for beginners, huh?
I couldn't make a neat looks on the tray, tho. But, believe me, the taste is so yummy! They're soft, tender, moist, sexy.... Like a Lady.... Mouth watering, tempting, so sinful!

source :
Bake Like a Pro - Molten Chocolate Lava Cake
Food Wishes - Molten Chocolate Love
Read more!

Monday, February 9

Crisp & Crunchy Fried Oatmeal Cake

This idea came this morning when I made too many oatmeal porridge for breakfast. I plan to eat that later but thanks to "Law & Order 15" series, I forgot about it for almost 30 minutes. When I look back to my bowl, my porridge already became too thick and sticky, yuck! Unable to eat that yucky mixture, I began to remember dumpling dough I watched from a cooking program days before. With a lot of guts, sprinkle of spices, some herbs, good vegetable oil, I deep fried them and... voila ! I made Crisp and Crunchy Fried Oatmeal Cake.


Yeah, I know they're not the prettiest Oatmeal cake.  The oil was used to fry shallots, I don't want to throw it because it give nice smell and flavor, and I forgot to strain it. Darn. Gotta strain it for the next batch

These cakes may not as healthy as usual oatmeal, but I think they're much better than frozen nuggets from store, and better than usual dumpling made from flour. I mean, it's oat~ full of fiber, good for colons~ okay, I just make excuses for this unbelievable yummy crunchy snack. Perfect for salad, mashed potato, rice (oh yeah I love rice), pasta, Super Bowl snack, everyone will make excuses for more plates.

Ohh, tell you what, the "crunch" sound made from this dish is... out of this world!

Ingredients : 
100 grams oatmeal
100 ml hot water
1 tbsp finely chopped ginger (use fresh ginger, please)
2 tbsp finely chopped celery (optional - other fresh herbs will do good)
1 tbsp granulated sugar (optional - skip if your leftover oatmeal already sweet enough)
1 tbsp fried shallot (optional - garlic powder is fine, too)
1 tsp white pepper powder (if you like it, add more)
1 1/2 tsp salt
enough vegetable oil to deep fried for the oatmeal cake to sink

Tools : 
Bowl
Good Knife
Spoon
Wok and frying spatula (or deep fat frier)

Let's start!

Okay, The Oatmeal. IF you have raw oatmeal, ground it a little bit. Not to smooth, otherwise you won't get the crunchiness. If you have instant oatmeal, which usually already grounded, that's good. Pour hot water over the oatmeal, in a bowl. Any bowl. Mix, mix, mix. Add ginger, celery, sugar, white pepper, powder, and salt. Mix them together.


Here comes the important parts.
Celery is the only herbs I found in my fridge. If you have rosemary, thyme, parsley, anything, try them or mix them all. It will give nice smell. And don't forget the ginger. Small but powerful enough to give fresh taste, not boring or bland.

Fried Shallot is common thing in my place, Indonesia. We can find them in every stores. If you don't have it, chopped shallot and garlic, mix it with salt, then deep fry them in over low heat. Don't have much time? Go to Asian store and you might fine them. If, you can't find any Asian Store (I know it's not that easy to find it), substitute with garlic powder and pinch of salt. How hard can that be?

The mixture is kinda look liked dumpling dough but not that stiff. It is sooo sticky and thick, can't be shaped by hand, even though your hand is covered by flour. See the picture below? Little mountain of sticky dough.

So how we shape it? Meet our magic tool, spoon. Yes, spoon! Take a spoon and Frying Spatula, make Hell's Kitchen's pose, light the fire, take a picture, post it on Ins.. okay, everybody stop! We'll get serious from here as we'll play with time, fire, and real hot oil.

Now, pour the oil into our wok or deep frier. Heat it to 375F. Turn the heat to low. Take the dough with the back of one spoon. Grease the frying spatula with oil, just dip it quick to the wok. Not all part, only the "spatula" part. Press the dough, shape it thin, gently drop each piece of oatmeal dough into hot oil.


Sorry for the bad pictures. My kitchen tools are kinda old, about 15 years old. They don't looked pretty but they've given my family awesome dish until today. That black color on the wok is not rust. It just...turn black after 15 years of hard work and burning oil.

Wait until the color turn to golden brown, allowing the skin to crisp. Maybe, about 1 minute per side. I said "maybe" because I didn't count the time. I just watch over the color. Remove from the oil and transfer to a paper tower lined plate. Serve immediately. Enjoy the Crisp and Crunchy Fried Oatmeal Cake.

That little piece is prettier, isn't it? I use strainer to filter the oil and reuse it

A little note, we often use breadcrumbs and flour+water or flour+egg batter to make crisp food, but you don't need them for this oatmeal cake. You can add 1 tbsp of flour or more if you don't like the goey texture. Craving for more vegetables? Add broccoli, carrot, peas, corn, anything. Just remember to boil them then mix them into the dough. Or more meat? Easy. Add bacon, ham, sausage, chicken, anchovy, just name it. Lovely, easy, crunchy, and the most important is, yummy.

Sorry if my English is kind of mess. I hope you understand the recipe thoroughly.
Read more!

Thursday, January 8

No Deposit Bonus Codes

Sometimes we are so tired that we can't enjoy our time in a club or local cafe. We go home on the evening, and again, stuck with internet.

How do you spend your evening in internet ?
You can check your fb account, next you can go to funny tube site,
or You can play online games for fun and win real money for beer and maybe for real estate *yes*.

Real money ? For real ? How ?

All easy

On CasinoBonus2.com you can find latest no deposit bonuses.

For example you can get $50 no deposit bonus and after when you'll do bonus terms you can cashout real money $50 $100 and more just for playing free games.

There on section No Deposit Bonus, you'll find many no deposit casino bonus codes
Read more!

Sunday, August 4

New Game With No Deposit Bonus

Few days ago, I got email about an online cash-game called as No Deposit Code. Curious about the cash, especially with no deposit, I checked it out to see what kind of cash or code I could get. First, I expected a website with fancy header about casino, poker, and stuffs, but it is actually has very simple and eye-friendly layout.


On the homepage, you'll see a simple header written "No Deposit Code" then a little bit down there, you'll see three tabs about No Deposit, Free Play, and Free Spins. Each tab offers a No Deposit Bonus Code for each game. On each tab, you can find some games with $100 no deposit bonus and some games with up to 44 free spins. Sweet, isn't it? Clean layout, user-friendly, fast loading, nice bucks.


When You have a free time You can play online casino without losing real money, You can try to play at casino with no deposit bonus codes. This is a special bonus codes for new and existing players. On the nodepositcode.net you can find lot of free casino coupons. Website is updated daily, so every day You can get new no deposit bonuses. It is almost felt as if you can get unlimited no-deposit-cash. So why don't you check it out and tell me how much cash have you got?
Read more!

Thursday, July 25

Hatsune Miku Wedding Concert (My Sketch)

Since I use "bloggeroid" app, I decided to write a post at least once a week for my blogs. That means I'll write a post every two weeks because I have two main blogs. One is my craft blog written in Indonesian, second is this lovely blog, Share Things.

Okay, let's begin...

Today I took a picture of my first ever Miku's sketch. I've been drawing her since two days ago at the office during lunch break or when I've done my job desk. In my sketch, you won't find Miku with her usual uniform. I tried to create another version of Hatsune Miku. I called it Hatsune Miku Wedding Concert. I imagine this is a scene where Miku sings on someone's wedding (outdoor wedding, precisely). Ah enough talking.. Here is my sketch..


half done sketch of Hatsune Miku Wedding Concert


Yes, it's still half done, a rough sketch. I've scanned it so the next job is tidy it up, put background, and then color it. Honestly, I planned to make a scene of Miku sings on her wedding! But I thought that's too cruel.. Someone might heart broken *lol*. So I changed it to Miku sings on someone's wedding. *hohoho*

For this wedding scene, I change her outfit. I draw Miku on formal dress with pretty butterfly ribbon on the back (I love butterfly, can't help it). She still wears the headphone and long pigtail (I won't change her trademark as a Vocaloid), though instead of her black/magenta ribbon, I changed them to butterfly (again) shaped hair ribbon. I plan to put magenta or tosca color for them. Oh, I add some accessories for her to strengthen her "wedding concert" image. She wears bracelet and pearl necklace! I like jewelry, duh. I can't tell about the detail of her jewelry yet. Truthfully speaking, I haven't decided the color and charms for her bracelet. I think of put a little butterfly (AGAIN!) charms and pinkish/blueish beads for the bracelet, but let's see what will pop up in my mind later...

Now, let' talk about the background. The idea is outdoor wedding scene but I still struggle how much detail I'll draw on. Flower? Definitely! I want a lot of flowers and a few butterflies (hahaha). I picture there'll be soothing green grass with beatiful bushes or flowers, some silhouette of column, and pretty blue sky. Is it enough? Ahh, okay, that's my next next job. Now I have to tidy the lines up on my laptop. Hope it will finished quickly remembering there're still many craft projects that have to be finished this month *facepalm*

Okay, that's for today..... See you on my next post, papoyyyyy! (*sorry, I'm into Minions these days.. -giggle-)

posted from Bloggeroid

Read more!

Friday, July 19

Free $50 Wine Voucher from BookDepository

Few weeks ago I ordered a classic novel from BookDepository, Oliver Twist. I'm a little bit nervous because that's my first time order book via online from foreign country, London and I'm living in Indonesia! Actually I wont buy i if it wasn't listed in "Annual Sale up to 90% Off". Thanks to my dear friend, Maria, who has introduced me to this (poisonously addicting) Free Shipping online book store, now I always eager to buy new books! *gosh..*

Okay, back to the book, two days ago there's a package came to my home and my eyes stuck in a word "Book Depository". Yahoooo! My new book! Great discount (I got 65% disc), fast delivery, and FREE SHIPPING! How cool is that, huh?


The package came with a novel (Oliver Twist), small brochure, receipt, a nice bookmark, and VOUCHER! It's a lovely $50 wine voucher. But since I can't use the voucher because the wine is located in Australia, I'll share it as a *giveaway* for my dearest reader.

Tadaaaaa.....


This voucher is valid for 1 person only, so be quick!! The first person contact me via email will be the first one who get the full scan including Terms of Service (there's special offers for people in _Sydney_)

Oh, here's the picture of the bookmark. You can see the website address clearly with a nice and tempting ads (oh no!).


If you're looking for a nice books and cheap shipping fee, just dig in to BookDepository. It's not just cheap, but it's free! Hooray for free shipping!

Well, that's it for today. Just remember to contact me quickly for the voucher since the time is limited!
Xoxo..
my email : amelia.angelina05@gmail.com

posted from Bloggeroid

Read more!

Wednesday, July 10

Manga review : Kamisama Hajimemashita

Long time no see, now I want to give you a MANGA REVIEW! It's a new topic for this blog. I know not all people familiar with "manga" so I'll describe "manga" a little for you.

Manga is the general Japanese term for comic. All the Japanese-made comic called as Manga, while the animation called as Anime. It has different style with western comic. Not only style, the story and theme of Manga usually more wider than western's, also the reader. While the reader of western comic usually are kids, Manga fans are vary from kids to adult. They even have to put age boundaries since they also produce smut (and porn) comics!

Enough with the introduction, now let's begin the review for this wonderful Manga

"KAMISAMA HAJIMEMASHITA" (Start Being A God).


The story start with a scene of Nanami, our main character, have a fighting with her useless (yes, USELESS) father about money. This very-useless father use all the money that Nanami save for gambling. The result can be predicted, he lost the money and run away (useless father, yes). Because of the gambling debts, Nanami being evicted from her apartment and become homeless. She meets Mikage (A Cupid-Love God?) and save him from a stray dog. As a thank you, he gives Nanami his house to stay then he go travelling. Of course Nanami is happy! But that's not long. When she arrives at Mikage's home, she is shocked to see that is is not a normal home but a small, run-down, and poor shrine for worship!!

After that she is greeted by both Onikiri and Kotetsu, the will-o-wisps who are the keepers of the shrine. She then meets Tomoe, the familiar of Mikage (a super strong and handsome fox youkai), and she learns that Mikage used to be the Earth Diety (Land-God) of the shrine and he has bestowed upon her his mark so that she may be the new Diety. At first she is reluctant but as she lives with Tomoe, Onikiri and Kotetsu she begins to understand and work hard in her new position as Earth Diety. As the story progresses Nanami finds herself falling in love with Tomoe, but he rejects her because the love between a human and a yokai is taboo. Despite saying that, Tomoe finds himself falling in love with her too.
But then....

Though it sounds so simple, the adventure is what make this manga is so interesting! The fact that Nanami is famous of her poorness make her doesn't want to go to school. She often get bullied by the boys and has no friend at all. One day she see a news that a super famous idol, Kurama, attend her high school and get into her class. Nanami feels so happy and decided to go to school to meet her idol. Tomoe doesn't like her decision since a powerless human-god is a delicious meal for monster and goblin. But the stubborn Nanami still go to school and get into trouble in the very first day. Tomoe who stalks her all day long can't stand it because if the Earth Deity was bullied, especially by human, it will hurt the shrine reputation along with all the residents (and Tomoe doesn't want his reputation as an high-grade fox going down even a bit!).

Finally, Tomoe steps into the school and steal everyone's heart because of his looks and his elegant manner. Later on, it's revealed that Kurama is a Tengu, a legendary creature of Japanese folk, a monstrous bird who can take a human form (usually has a red face, but of course in Manga, a Manga-ka is free to pour their own version of Tengu). And... Kurama is interested in Nanami! Next day, Tomoe decided to enroll in the school Nanami goes to and get into the same class as Nanami to protect her. How did he pay it?? Don't ask. He is a powerful fox youkai, so he can create illusion and hypnotist people without trace.

As time goes by, Nanami meets many other God and Goddess even help their romance-relationship (love between God/supernatural being with human is taboo, but somehow Nanami shows her skill here!). Even though she is not as powerful as other Gods, but her purification method is unbeatable. Her pure heart and strong will make Nanami keep walking, even in difficult path, when Tomoe is dying because of the cursed (oops! spoiler!). Thank to her other familiar, Mizuki, Nanami can go back to the past to find the cure for Tomoe (oopsiee.. another spoiler)

Her past-time journey is the most interesting chapter for me. It reveals everything. Who is Tomoe, how can he get that horrible cursed, his love story, and many things! I'm still curious about the next chapter because the key to lift the curse hasn't been found yet. I know the item but how can it switch to another person?? And.. and.. why Nanami's mom said that all female in their generations born georgously but always get married to undependable man. And.. in the past-time journey, Nanami meets a girl with the same face as her! Is it related?? Or just a rumour?? Will Nanami get the key in time since there's a time limit to go to the past and Tomoe only have 2 days left?? Argghh it's so killing me! I hope the new chapter is released soon!
That's all the review for Kamisama Hajimemashita today. Maybe I'll review it later when this manga is complete. Below are a few notes that will help you while reading this Manga

NOTE

  • Youkai : Yōkai (妖怪?, ghost, phantom, strange apparition) are a class of supernatural monsters in Japanese folklore. The word yōkai is made up of the kanji for "mysterious" and "weird". Often they possess animal features (such as Kurame, The Tengu which has wings while Tomoe, The Fox has fox's ear and tail), other times they can appear mostly human, some look like inanimate objects and others have no discernible shape. Yōkai usually have a spiritual supernatural power, with shape shifting being one of the most common.
  • God : In this manga, God is refer to polytheism of Shinto. God and Goddess in Shinto based on nature so they often have an animal, plant, or human shape with their own task. Confuse? Worry not, you'll understand more about Shinto-God by ready this manga! Isn't it wonderful? Fun learning~!
  • -Ou : Sometimes you'll see name with -Ou (example, Akura-Ou). -Ou has similar meaning as The Great. So.. Akura-Ou means Akura The Great, who has the great evil power belong youkai


I only give you 3 note since you'll get many helpful notes in manga scan. If you want to read the manga scans online, I recommend you visit these sites :


Okayyyy, see you later ^o^ Jya mata ne~
Read more!

Sunday, October 7

Twinkle Flowers Nail Art Tutorial

Hi ! how's you been doing this week? Did you remember when I said in the previous post that I began to love nail art? Yep, I even show you my milk strawberry nail art right? Do you like it?? Hope so *wink*

Today I finished another nail art. Tadaaa!!

I call this "Twinkle Flowers".
It has some cute little flowers and little dots that make my nails looks twinkling. 
And I'm willing to share the tutorial now!

Tools I use are very simple and affordable!
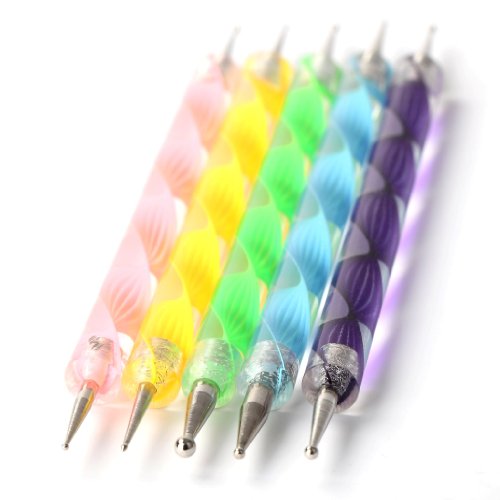
1. A Dotting tool. This tool has 2 heads, each with different sizes. So it's really handy. I only bought 1 and I plan to buy the whole set now :)
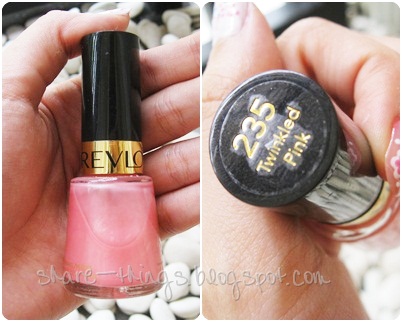
2. Revlon Nail Polish. 235 Twinkled Pink (see?? It's twinkle!) as base. I love its soft and natural pink color. This one is a long dry but blend nicely as base

3. white and pink nail polish. I use very quick dry for pattern. Believe me, we don't want a long dry nail polish to make pattern as it will be harder to put layer on later. If your base is white, then you need white nail polish for the upper color of the flower. If your color base is pink, then choose pink nail polish. You can use same nail polish for your base and top flower.
4. Palette. I use my own palette which I often use for water color (I like drawing and coloring using water color so I have some palettes in my room)
And how to make it?? Here I share you the tutorial. In this tutorial, the nail polishes that used for the base and flower are white and blue

FIRST, take the very basic step, cover your nail with base nail polish (let's use white).
If you think that the base is too transparent, put second layer or maybe third. It's up to you. I, myself, put 3 layer for my base since this twinkled series is very natural pink colour. Wait until the base dry (It's better to have the base dry before you make the pattern). Done? Now get ready for the twinkle tutorial!

1. Dap some of nail polish to the palette and dip the tip of your dotting tools to create the flower.
2. Add dots to your nail using dotting tools in a shape of 5 flower petals.
3. Put some dots again to make the flower bigger and to cover the middle area
4. Using smaller size of the tip of the dotting tool, add smaller dots along the edge following the shape of the flower.
5. Now go back to the base nail polish (or the one that has the same color with the base). Using this nail polish, dot in smaller flowers to create the border.
6. Finish?? Now dot in the center of the flower using bright color or the same color as flower's border. You can add few more as decoration.
FINISH! Now you have twinkling nails that everybody will envy! Watch full video tutorial here.

[A LITTLE TIPS]
* I put the dots on my 5 fingers before going to the next step (I say 5 fingers because I need my other hand to do the works). Since I use quick dry nail polish for the pattern, I can immediately do the next step on my first finger after finish the previous step. The first finger should be already half dry =)
* You can use combination of yellow-white, purple-white, red-white, or maybe yellow-orange! Come on give try and polish your nail =D

Now, time to say bye-bye. I have to get ready to the church!
Happy weekend everyone :) !
Don't forget to show off your nails!
Read more!

Friday, September 14

A Peek at Casinobonus2.com

Hello, we meet again! After a long time thinking about my next post, finally I found a topic.

First, tell me, how many hours have you spent today for online (browsing, gaming, etc) ? One hour? Two hours? Or maybe more than 8 hours? And what do you online for? I know some of you did for entertainment, some for working. Me? I've spent 3 hours today, 2 and a half hours for entertaining myself (browsing, gaming, and social network) and a half hour for working (duh!).


It must be nice if we can entertain ourselves while getting a little (or big--up to you) cash. For me casinobonus2.com can make it happen. There are so many bonus codes we can get for free and so many fun and attractive games we can play there such as Pirates, Alice in Wonderland (love it), Cream of The Crop, A Night in Paris, and many more (yeah, I'm a girl so I prefer girly one). Not only free, we can get $5 - $500 of no deposit bonus! We can cash out real cash by complete the Wagering Requirements (WR) and the average WR can multiple the bonus for 20-30x!

many fun games

Example, we have $5 of "no deposit bonus" and we get 20x of WR, means we can cash out real cash $100. It's so easy. We just need to complete WR requirements at http://casinobonus2.com/ and kaching! We get the money! And how if we don't know how to play??? Don't worry, there's community section in casinobonus2.com where people share their tips and trick to help others. Isn't that nice??? This way, we can have fun while getting cash. So y u no join me there? ;)
Read more!

Saturday, September 8

I'm back!!

Heeeellloooooo everyone!!
This is my first touch with this blog after 3 years. Yes, my last visit to blogger was 3 years ago. Such a long time, isn't it? I'm so sorry T_T I won't abandon my blog again, ever!
So my desire to blogging (again) started this morning when I googled about nail art and found many beautiful blogs. A tiny voices "I miss my blog" occured in my mind and hours later (8 hours later, gosh!) I decided to take a peep to my Share Things. OH my! I still have visitors! A little spark sparks in my heart. My heart start beating fast while I read all those comments. It's.. amazing.. happy.. almost tears.. okay a little bit exaggerate.. but truly I feel so much joy I can't describe. Then my fingers suddenly did tap dance opening my blogger account. Uh-oh So much changes! I felt a little bit confuse with this new layout but gladly it didn't take a long time to adapt. Sooo... Now here I am, typing new post for my blog. First post after 3 years (sorry). Within this 3 years, so many things happened to me and hmmmmm... How about a little sharing? I promise it won't hurt.. Let's start anyway ;)

1. I've graduated! 2 years ago I finished my architecture study at Petra Christian University (Surabaya, Indonesia).

The photo above is me in graduation ceremony :) Here in Surabaya (my lovely city) we have to wear KEBAYA (Java traditional outfit) in graduation ceremony.
  Make up and hair were beautifully done by my mom. She runs a Salon, SPA, and Bridal in Bali named "Henny Gunawan Salon". You should come when you visit Bali ! She have a TOP service with very reasonable price, great for both tourists and locals

2. I've found a job! I worked as a project admin for high rise building. My current project is apartment ;) Here is the photo of the project
Hmmm what do you think?? Isn't it cool =D

3. I'm still doing crafts ~
I have to admit, during this 2 years, my performance was a bit slacking and not good. So I decided to make a brand new start, 
more discipline, more creative
You can purchase my stuffs by send me message by click contact on menu above

4. I have some new hobbies around ;) nail art and bakery. Here is what I've done today.. STRAWBERRY MILK theme! What do you think??
ingredients : green + soft pink + white nail polish. Tape. Dotting tool. Top coat nail polish
I'm still a noob though, but satisfied enough with the pink color ^_^ 
maybe I'll do lemon or kiwi next time..

5. I learned how to apply make up. Seriously, i don't really like wearing make up but the office made me done it. Of course, the only thing I can do is "daily make up"
Uh huh.. that's me in one of my office outfit. Hmm sorry the "daily make up" is so thin. 
I've told ya, i don't really like wearing make up. 

Those are 5 things I could share this time. Actually I want to make it 10 but I have to finish my panda keychains =_=" Ohh here are some random photos from my computer, my family, my crafts, my bakery stuffs :) Hope you enjoy my photos (sorry some photos were not taken well. I'm not really good in photography)
Read more!

Chat with me

Creative Commons License Copyright licensed by :Creative Commons Attribution 3.0 Unported License. We allow people to copy and distribute our work provided they give us credit - URL backlink to the article or to the our homepage,http://share-everythings.blogspot.com.
Twitter Delicious Facebook Digg Stumbleupon Favorites More